Ceiling Wallpaper Explained: Why and How
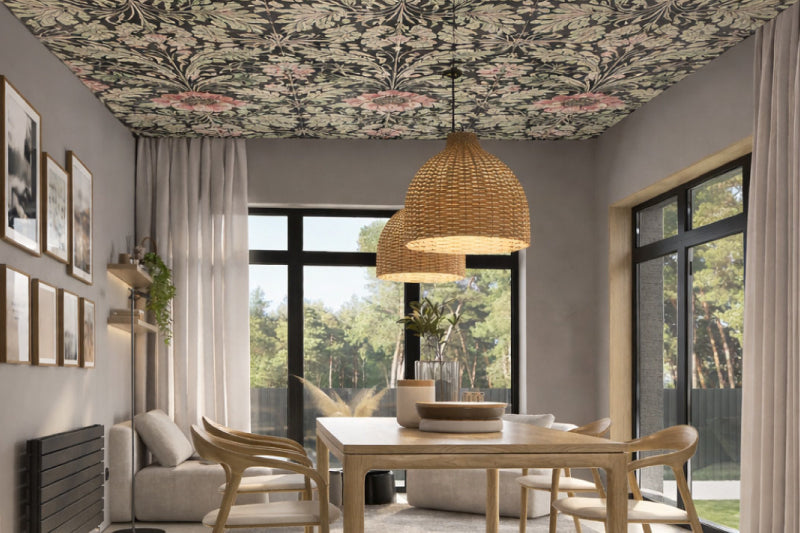
Ceiling wallpaper, often referred to as the “fifth wall,” is a major design trend. But it’s far from a modern invention. This decorative approach dates back to the Late Victorian era, when ceilings were treated as an integral part of interior design. At the time, pressed tin panels were commonly used. But in the modern age, wallpaper has taken over, offering a more versatile and less expensive way to decorate. Even today, it's considered an unusual choice. Quite eccentric. When done right, it becomes a beautiful statement. And yet, it’s easy to see why it isn’t more common. Where do you even begin, and how do you make it work? Let’s take a closer look at beautiful ceiling designs that create a peaceful environment.
Table of Content
Ceiling Wallpaper Ideas
The key to making ceiling wallpaper work is to match the interior to the print or color. When the print or color on the ceiling is paired with wall paint, furniture, or the overall interior style, it instantly feels more cohesive rather than overwhelming. Ceiling wallpaper works especially well when you lean into bold colors, playful motifs, or eye-catching patterns that turn the “fifth wall” into a statement. Whether you echo the walls' tones or use contrast to create drama, the goal is to let the ceiling design complement the room while standing out.
Sounds a bit complicated? Let's look at some designs that will make it easier to understand.
Florals
Floral wallpaper is a classic pattern that never goes out of style. With so many variations available, choosing the right one can feel overwhelming. From soft, romantic lilies to bold, oversized blossoms, each style creates a distinct mood. While delicate patterns work beautifully for calm, airy interiors, large, expressive florals instantly become focal points in the space, naturally attracting attention to the ceiling. Try matching the floral style to the room’s overall aesthetic and size. For example, in smaller spaces, opt for lighter colors with details to keep the room feeling open, while larger rooms can comfortably accommodate dramatic, bold patterns and richer color palettes without feeling crowded.

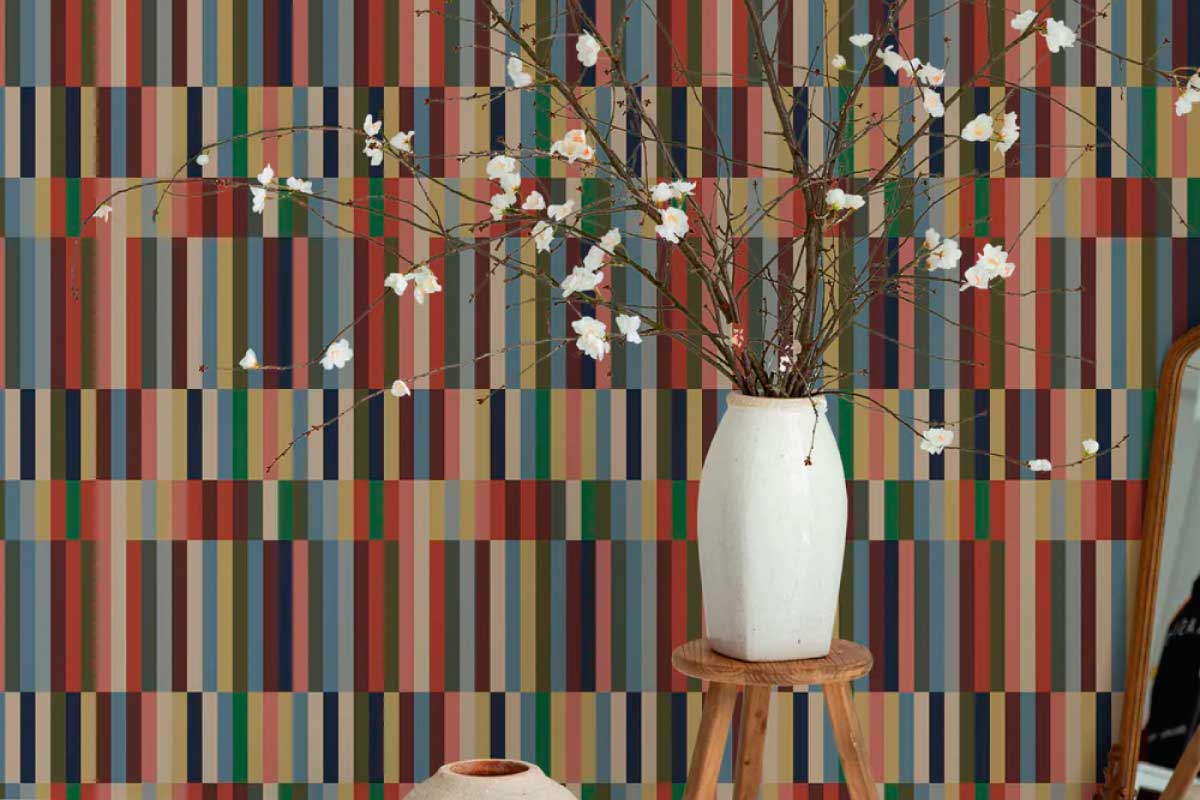
Bold Geometric Statements
Certainly, a calmer option than flowers would be a geometric pattern or chic Art Deco designs. While bold color choices often define this style, structured patterns truly set it apart from ordinary lines and shapes, which could make your home look a little outdated. In contrast to traditional geometric designs, Art Deco elements such as repeating shapes and symmetrical layouts create a sense of order, making these designs feel less overwhelming. A tip: Like striped clothing, striped wallpaper can make a room look wider, perfect if you have a narrow living room, bedroom, or even hallway.

The Classics – Black and White Themed Wallpaper
If you're looking for a larger contrast palette, this is the best choice. A style that feels modern, still minimalist, and not overly complicated. The best thing is that if you already have white walls, there is no need to repaint, and the truly unique bits come from the decor elements.

Decked in Gold
Nothing says the Gilded Age more than having your home decked out in gold elements. The great thing is that, unlike silver, gold blends more effortlessly into a space, adding warmth rather than coolness. In wallpaper designs, gold details can make the home feel more luxurious. But the saying "a little goes a long way" is worth remembering. Too much gold can quickly overwhelm a room, while subtle accents, fine linework, or softly shimmering patterns create balance.

How to Wallpaper a Ceiling: Step-by-Step Guide
Have you already purchased your ceiling wallpaper, or are you still thinking about the installation process? A little preparation goes a long way for ceiling applications. From checking ceiling height and surface texture to deciding whether you’ll need extra help during installation, planning ahead helps avoid unnecessary frustration.
Taking time to prepare also ensures you have the right tools and setup in place before you begin, making the entire process smoother and more efficient.
Tools You'll Need
First things first: before installing wallpaper on a ceiling, make sure you have the right tools on hand to achieve a clean, precise result. Essential instruments include:
- A measuring tape
- A level or laser level to keep patterns aligned
- A sharp utility knife for accurate cuts.
You’ll also need a smoothing tool, such as a wallpaper squeegee, a step ladder or scaffolding for safe access, and a clean cloth or sponge to wipe away excess adhesive if you’re applying traditional wallpaper.

Once your tools are ready, the next step is to choose the right wallpaper for your ceiling type. Not all wallpaper types carry the same overhead, and factors such as weight, adhesive strength, and ease of handling play a major role.
Wallpaper height and texture
You can install various types of wallpaper on a ceiling, provided the material is designed to adhere securely to the surface. While traditional non-pasted wallpaper is often the most durable option, it can be challenging to work with due to its weight, especially once adhesive is applied. Moreover, it creates a mess when the glue drips. This added weight and stickiness make ceiling installation more demanding. That’s why we recommend peel-and-stick wallpaper. It’s lighter, easier to position overhead, making it an ideal choice for ceiling applications.
That said, there are advantages and disadvantages to both wallpaper types, depending on your ceiling's texture, height, and type.
How do I apply wallpaper to a popcorn ceiling?
Applying peel-and-stick wallpaper directly to a popcorn ceiling is generally not recommended, as the textured surface prevents proper adhesion and can cause peeling over time. The most effective approach is to first smooth the ceiling by removing the popcorn texture, applying a skim coat, or installing ceiling panels. Once the surface is flat, clean, and fully dry, wallpaper can be applied. This extra preparation step ensures better adhesion, a cleaner finish, and a more polished overall look.
But removing the texture isn’t always an option. Its time consuming are often expensive. That's why, for this ceiling type in particular, traditional wallpaper is the best option, as the paste will help fill gaps in texture and improve grip.
But keep in mind that this is a permanent solution and, if you are renting, it is generally not recommended.
How to apply wallpaper on a curved ceiling?
For a curved ceiling, peel-and-stick wallpaper is the best choice due to its lightweight nature. There’s less chance of ripping it while maneuvering around the curve, since this type of installation usually takes a bit more time and adjustment. Peel-and-stick wallpaper is also more forgiving, allowing you to reposition sections as needed while ensuring the material conforms smoothly to the ceiling’s shape without soaking the ceiling.
Step 1, of course, is to prepare the ceiling. Clean the ceiling thoroughly to remove dust and debris. Repair cracks or seams, sand until smooth, and apply a wallpaper primer to ensure proper adhesion. For curved ceilings, plan to use narrower wallpaper strips for easier handling.
Step 2 is to find the center and start straight. Locate the center point of the ceiling and apply the first strip perfectly straight. This strip acts as the anchor for the rest of the installation. From the center, work outward in both directions, gradually following the curve.
Step 3 is for adjustments. On tighter curves, make small, discreet relief cuts along the edge of the wallpaper to prevent puckering and help it sit flat. Smooth each strip carefully as you go, trimming excess material for a clean, seamless finish.

How to apply wallpaper on a high ceiling?
Whether you choose peel-and-stick or traditional wallpaper, the application process is similar to installing wallpaper on a regular ceiling. However, additional support and the right tools are essential. You’ll need a tall stepladder or, preferably, scaffolding to work safely and comfortably overhead. Scaffolding can be rented from a local hardware store or ordered online from retailers such as Amazon, making the installation process more stable and efficient
We also recommend having a second person assist during installation. One person can support the loose end of the wallpaper and help guide alignment, while the other smooths the panel into place. Once the wallpaper is fully applied, allow it to settle before trimming any excess.
How to apply wallpaper on a vaulted ceiling?
While applying wallpaper overhead can feel a bit tricky and uncomfortable, peel-and-stick wallpaper is an excellent choice for vaulted ceilings due to its lightweight design.
When installing wallpaper on a vaulted ceiling, work on one plane at a time rather than attempting to force the material across sharp angles. Allow the wallpaper to meet naturally at joints or peaks, and trim any excess only after the panel is fully secured. Forcing wallpaper into tight angles can create tension, which may cause lifting or peeling over time.

How to apply wallpaper on a false ceiling?
False ceilings are commonly made of gypsum board, POP, or MDF, and all of these surfaces must be properly sealed before installing wallpaper. Start by checking that all panels are securely fixed, stable, and free from movement, as even slight shifts can affect adhesion.
For these ceiling types, peel-and-stick wallpaper is generally the better option. Once the surface is sealed, primed, and smooth, peel-and-stick adheres well without adding extra moisture or weight, which is especially important for suspended or false ceilings. It’s lighter, easier to reposition, and puts less stress on joints and panels.
Traditional wallpaper can also be used, but it requires extra caution. The added moisture and weight from the adhesive may increase the risk of sagging or joint stress if the ceiling is not perfectly prepared.

Things to Avoid When Installing Ceiling Wallpaper
Remember, ceiling wallpaper is not waterproof. While some wallpapers are moisture-resistant, they are not designed to withstand direct water exposure, condensation buildup, or prolonged humidity. In these environments, the adhesive can weaken, leading to peeling, bubbling, or lifting over time.
As a homeowner or renter, peel-and-stick wallpaper should never be used to hide cracks, peeling paint, or structural imperfections. Any existing damage will show through over time and can prevent proper adhesion. Cracks should always be repaired, sanded smooth, and fully primed before applying wallpaper.
Patience makes perfect
To sum it up, ceiling wallpaper is a bold design choice that can completely transform a room when done right. With the proper preparation, the right ceiling type, and a clear understanding of what to do and what to avoid, it can become a striking feature rather than a risky experiment.
Whether you’re looking to add depth, pattern, or an unexpected design moment, ceiling wallpaper offers a creative way to rethink your space. Just remember that success lies in the details, patience, and choosing the right materials for the environment.